Quick Start
Before you begin, we recommend following these initial steps:
Obtain Starter Package: You will receive an email from your account manager containing the starter code package and a test yb_uid. If you haven’t received it yet, please reach out to your account manager to get started.
Setup
1. Enable Capabilities and Add Entitlements
Open the DEMO/TunnelKit.xcodeproj in Xcode and run it on iOS.
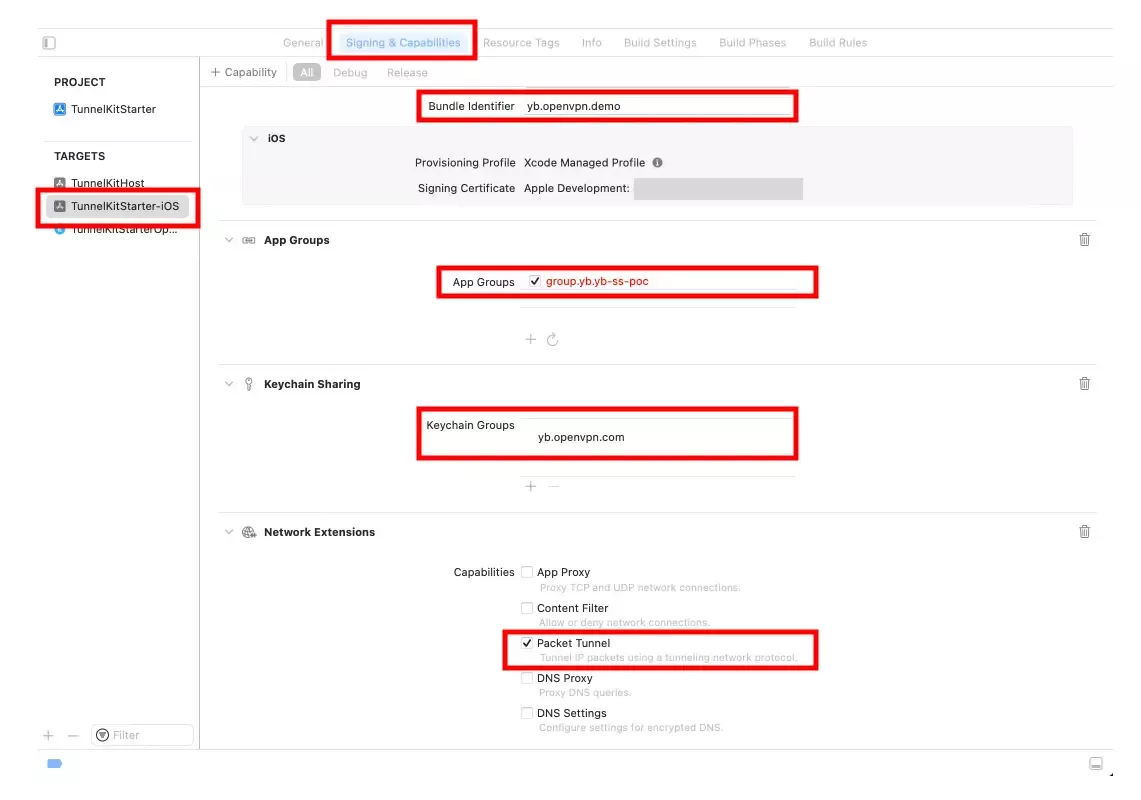
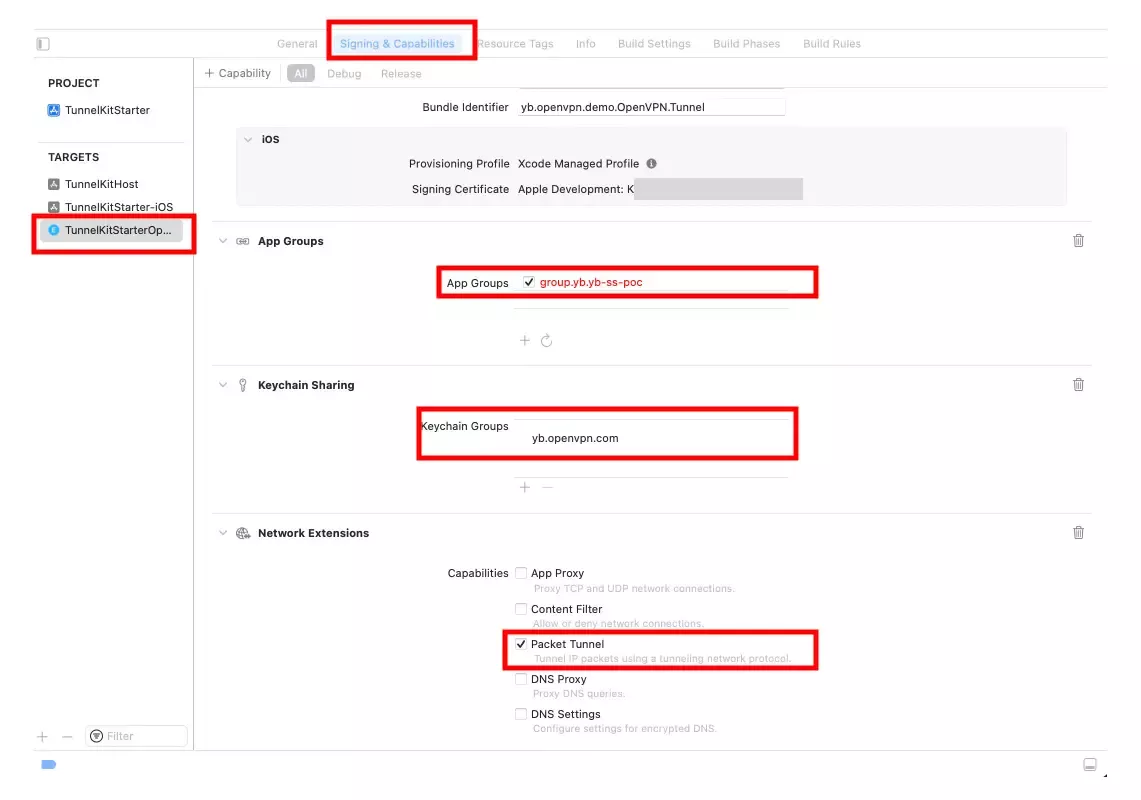
To set up the VPN properly, follow these steps in both the main app and the tunnel extension targets:
- Enable App Groups and Keychain Sharing capabilities.
- Ensure your App IDs have Packet Tunnel entitlements.
For guidance, refer to the screenshots below:
Main App Target:

Tunnel Extension Target:

2. Update the appGroup and tunnelIdentifier in *ViewController.swift
In your *ViewController.swift files, you will need to update specific constants with values corresponding to your developer account and target bundle identifiers. These constants play a crucial role in facilitating communication between your main app and the tunnel extension.
Please follow these steps carefully:
1. App Group Identifier (appGroup):
-
appGroupis used to create a shared container for data that can be accessed by both the main app and the tunnel extension. -
Ensure that the
appGroupidentifier remains consistent throughout your code base and all related targets. It should match the value specified in the “App Group” configuration.
For example, in the starter code, we use the following appGroup identifier:
private let appGroup = "group.yb.yb-ss-poc"
2. Tunnel Extension Bundle Identifier (tunnelIdentifier):
tunnelIdentifier represents the bundle identifier of your tunnel extension target. It should match the identifier you’ve set in the Tunnel Extension Target’s settings.
For example, in the starter code, we use the following tunnelIdentifier:
private let tunnelIdentifier = "yb.openvpn.demo.OpenVPN.Tunnel"
Warning: Ensure that both the appGroup and tunnelIdentifier values are accurately configured to prevent communication issues between your main app and the tunnel extension..
3. Run on Physical iPhones (Not Simulators)
After completing the above steps, you should be able to run the starter on physical iPhone devices.
Warning: Simulators do not support Packet Tunneling, so you can only test this on physical devices.
Core Methods Explanation
Tunnel Connection Flow
- Authentication: Begin by logging in or registering using the 21YunBox SMS/Auth APIs.
- Obtain
yb_uid: Upon successful authentication, obtain a uniqueyb_uid. - Connecting to Firebase: When you need to access Firebase, call the
connect()method.
Connect to the Tunnel
Once you have obtained a yb_uid from the Auth API, you can pass that ID to our server, and we will load the configuration file for the connection.
Here is an example of how to connect to the tunnel using yb_uid:
func connect() {
    // TODO: Replace 'your_yb_uid' with your actual ybUID.
    // See 21YunBox Auth API, '/check-code' to obtain ybUID in production.
    let ybUID = "your_yb_uid"
    Task {
        cfg = await OpenVPN.loadConfig(ybUID: ybUID, appGroup: appGroup)

        do {
            try await vpn.reconnect(
                tunnelIdentifier,
                configuration: cfg!,
                extra: nil,
                after: .seconds(2)
            )
        } catch {
            print("Failed to reconnect: \(error)")
        }
    }
}
Disconnect the Tunnel Connection
To disconnect the tunnel, simply call vpn.disconnect():
func disconnect() {
    Task {
        await vpn.disconnect()
    }
}
VPN Event Notification Codes
There are three kinds of notifications you can listen to for your business needs:
VPNNotification.didChangeStatusVPNNotification.didFailVPNNotification.didReinstall
Here’s an example of how to use them:
NotificationCenter.default.addObserver(
    self,
    selector: #selector(VPNStatusDidChange(notification:)),
    name: VPNNotification.didChangeStatus,
    object: nil
)

// ...

@objc private func VPNStatusDidChange(notification: Notification) {
    vpnStatus = notification.vpnStatus
    print("VPNStatusDidChange: \(vpnStatus)")
    updateButton()
}
VPN Status Codes
There are four different VPN status codes to use based on your business needs:
connectedconnectingdisconnecteddisconnecting
For example:
@IBAction func connectionClicked(_ sender: Any) {
    switch vpnStatus {
    case .disconnected:
        connect()

    case .connected, .connecting, .disconnecting:
        disconnect()
    }
}
Feel free to add any additional details or clarifications as needed for your users. For further assistance or troubleshooting, reach out to your account manager and SEs.
Trouble Shooting Guide
Q1: How do I know if I’m connecting to the tunnel?
Before connecting to the tunnel, follow these steps to verify your connection:
- Open a web browser on your device.
- Visit one of the following websites to check your IP address:
When you open these sites, they will display your current IP address.
Once you’re connected to the tunnel, perform the following steps to confirm your connection:
- Check your IP address again.
- If the connection is successful, your IP address should now reflect our tunnel IP address, not your original one.
For users of our starter kit, you can simply click the “Get my IP” button, and the IP address will be displayed in the console.
Note: Please be aware that the myip.21cloudbox.com server is hosted in China, so if you are developing outside China, you may experience a 1-2 second delay depending on your location.
Q2: I’m encountering difficulties connecting to XYZ APIs or services while connected to the tunnel.
This issue is intentional and stems from the restricted access to certain services and APIs. Here’s what you can do:
-
Review our allowed services and APIs list. If the service you need is not on the list, contact your account manager with a valid reason for accessing it. We will work with you to add the necessary IP addresses for access.
-
For Firebase services, our system continuously updates our IP address database to ensure seamless connectivity. However, if you experience difficulties connecting to Firebase services in China, please reach out to your account manager. Explain the specific Firebase services you are having trouble with, and we will assist you from there.
Note: Access to new APIs or services may take some time due to the need to ensure compliance with Chinese laws. Please be patient during this process.
Q3: “Could not reach Cloud Firestore backend”. How do I resolve this?
Typically, you will see an error message like the following in your logs:
[FirebaseFirestore][I-FST000001] Could not reach Cloud Firestore backend. Backend didn't respond within 10 seconds.

This usually indicates that your device does not have a stable Internet connection at the moment. The client will operate in offline mode until it can successfully connect to the backend.
This error occurs when you attempt to read content from Firebase Firestore without being connected to the 21YB Tunnel. Ensure you follow the instructions above to connect to the tunnel. After verifying your connection, try reading from Firestore again.
If you still encounter the same message in your logs while the tunnel is active, please reach out to your account manager for further assistance.
Q4: Stream error: ‘Unavailable: failed to connect to all addresses’. How do I resolve this?
Typically, you will see an error message like the following in your logs:
[FirebaseFirestore][I-FST000001] WriteStream (13be526e8) Stream error: 'Unavailable: failed to connect to all addresses'
This error occurs when you attempt to write content to Firebase Firestore without being connected to the 21YB Tunnel. Ensure you follow the instructions above to connect to the tunnel. After verifying your connection, try writing to Firestore again.
If you still encounter the same message in your logs while the tunnel is active, please reach out to your account manager for further assistance.
By following these troubleshooting steps, you can ensure a smoother experience while using our tunnel service. If you have further questions or issues, don’t hesitate to contact our support team. We are here to assist you.

